
sales@sztimeast.com
+86-15989541416

Before investing in ultrasonic welding equipment, manufacturers must ensure that the process
should work reliably with your specific parts, materials, and production needs. A quick testing
phase helps reduce risks, avoid expensive rework, and ensure the right machine setup from the beginning.
Start by writing clear acceptance criteria. Typical criteria include:
Weld strength (tensile, shear, or peel targets)
Leak or burst performance (for sealed parts)
Cosmetic limits (flash, marks, darkening)
Dimensional limits (warp, collapse distance)
Cycle time and throughput needs
Scrap rate and consistency
Ultrasonic welding depends heavily on the polymer type, fillers, and moisture content.
Identify exact resin grades, not just “PP” or “ABS”
Note additives (glass fill, flame retardants, pigments)
Review melt temperature, modulus, and damping behavior
Check part design features (energy directors, joint type, wall thickness)
If you are welding dissimilar plastics, verify that they are chemically and mechanically compatible.
Validation is only meaningful when samples match production reality:
Use production-intent tooling or high-quality prototypes
Include real tolerances, gate vestiges, and surface textures
Condition parts the same way you will in production (drying, storage, temperature)
Most equipment suppliers and independent labs can run trials using their own systems. Provide:
Parts and material data sheets
Required output rate and quality targets
Any special constraints (no visible marking, strict flash limits)
During trials, capture key settings and results:
Frequency (20/30/40 kHz) and horn type
Amplitude range, force, and hold time
Weld mode (time, energy, peak power, collapse distance)
Power draw, weld signature stability, and variation across samples
Choose tests that reflect real use:
Mechanical strength testing (with sample size large enough for statistics)
Cross-sections to inspect melt flow and voids
Leak testing (pressure decay, vacuum, or bubble)
Visual inspection standards and acceptable defect limits
Document failures carefully—where the joint fails often matters more than the absolute number.
If results are inconsistent, the fix is often in the design:
Adjust energy director height/angle
Improve part support and fixturing
Add alignment features to control collapse
Consider a higher frequency for delicate parts or tighter cosmetics
Review horn contact area and surface finish
A good process runs well even with normal variation. Test:
Low/high part tolerances
Material lot changes
Temperature and humidity shifts
Operator and setup differences
Define a robust process window for amplitude, force, and weld time/energy, and confirm quality
stays within limits.
Before purchasing, decide what level of control and record tracking you need:
Weld signature monitoring (power, energy, distance, force)
Limit alarms and reject handling
Data logging for compliance and audits
Vision or leak test integration
Fixture sensors (part present, clamp confirmation)
Beyond the welder price, consider:
Horns, boosters, and spare stacks
Fixtures and part handling
Sound enclosure and safety systems
Maintenance plans and calibration
Operator training and validation documentation
Summarize:
Parts/materials tested and sample conditioning
Trial settings and optimized ranges
Test methods and results
Risks, open issues, and recommended equipment specification
With these steps done, you can buy ultrasonic welding equipment with confidence. You will know
it meets your technical needs and production realities. plastic parts can be welded successfully
and consistently.
Many companies make the mistake of purchasing ultrasonic welding machines first,
only to discover later that their products suffer from weak weld strength, cosmetic defects,
or poor sealing performance. These issues often lead to production delays, increased costs,
and even product redesign.
Ultrasonic welding is not just about the machine—it is a combination of material properties,
joint design, and process parameters. Without proper validation, even high-end equipment
may fail to deliver expected results.
This article explains how to validate ultrasonic welding before buying equipment, helping
manufacturers reduce risks, optimize design, and ensure reliable production.
Ultrasonic welding performance depends on multiple variables, including
plastic material, part geometry, joint design, and welding parameters.
Without validation, manufacturers may encounter:
insufficient weld strength
product deformation
surface defects such as whitening
air leakage or sealing failure
inconsistent production results
These problems are not always caused by the equipment itself but often result from improper
application design.Validation ensures that the welding process is feasible before making a
capital investment.
The first step in ultrasonic welding validation is to determine whether the plastic material
is suitable for ultrasonic welding.Different plastics respond differently to ultrasonic energy.
Amorphous plastics generally weld more easily, while semi-crystalline plastics require more
precise control.
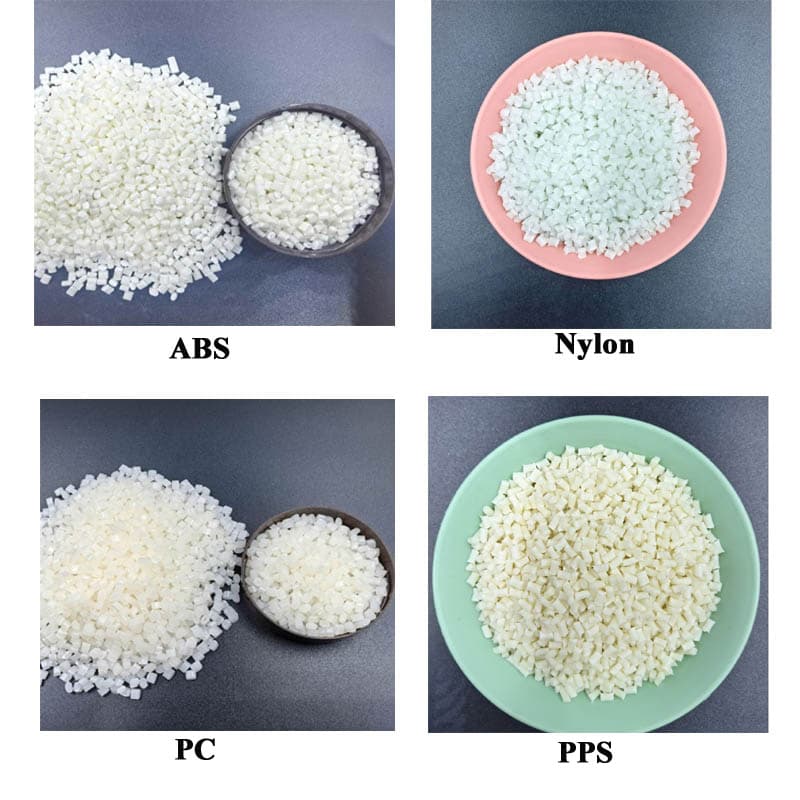
Common materials include:
ABS – excellent welding performance
PC – strong and consistent welding performance
PP – more challenging, requires optimized parameters
Nylon – sensitive to moisture and process conditions
best plastics for ultrasonic welding
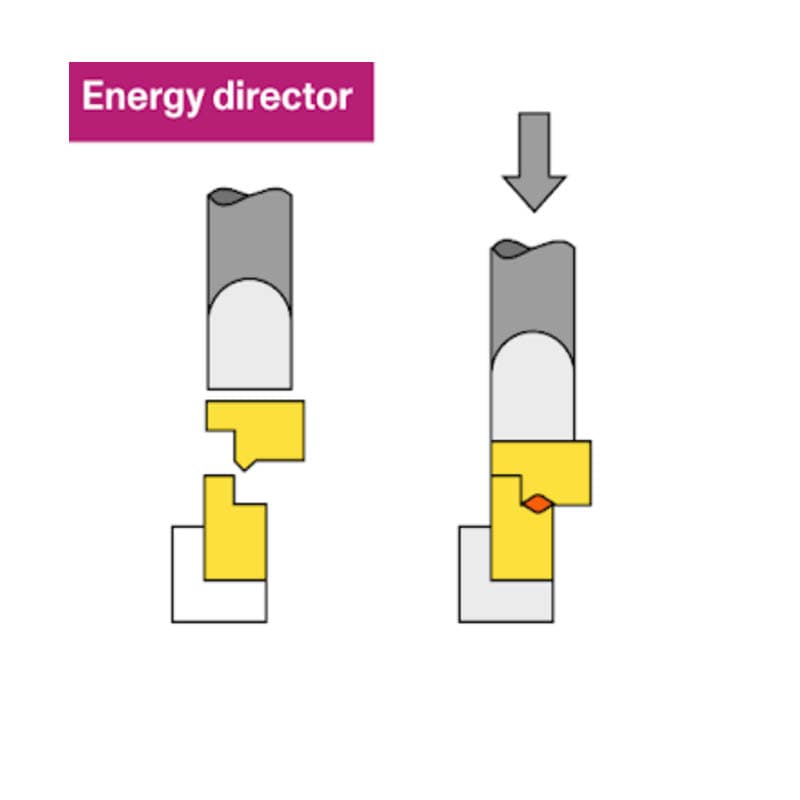
Joint design is one of the most critical factors affecting ultrasonic welding success.
A well-designed joint helps concentrate ultrasonic energy at the correct locati0n,
ensuring efficient melting and strong bonding.
Common joint types include:
energy director joints
shear joints
tongue and groove joints
Poor joint design can lead to:
uneven energy distribution
excessive flash
weak weld strength
Sample testing is the most important step in validating ultrasonic welding.
Instead of relying on theoretical assumptions, manufacturers should perform
actual welding tests using their real parts.
Sample testing allows engineers to evaluate:
weld strength
appearance quality
sealing performance
parameter optimization
Testing also helps identify potential defects early, such as cracking or whitening.
ultrasonic welding sample testing
Testing should be as close to real production as possible.These include:
amplitude
welding time
pressure
hold time
Incorrect parameter settings may result in:
overheating
material degradation
stress whitening
cracking
Beyond weld quality, manufacturers must evaluate whether the welding process is suitable
for mass production.
Key considerations include:
cycle time
automation integration
process consistency
operator requirements
A process that works in a lab environment may not always perform well in production.
Try to test the process in real production conditions whenever possible.
After completing validation, manufacturers can confidently select the appropriate ultrasonic
welding equipment.
Machine selection depends on:
material type
part size
production volume
precision requirements
For example:
Many manufacturers make mistakes during the validation process.
Common errors include:
skipping sample testing
ignoring joint design
using incorrect parameters
selecting equipment too early
Avoiding these mistakes can save significant time and cost.
Validating ultrasonic welding before buying equipment is essential for ensuring successful production.
By verifying material matching, optimizing joint design, and conducting sample testing,
manufacturers can significantly reduce risks and achieve reliable welding results.
Phone: +86-15989541416
E-mail: sales@sztimeast.com
Whatsapp:008615989541416
Add: Building 5, Huixin Intelligent Industrial Park,Guangming, Shenzhen,China 518107